Thursday, December 17, 2020

Building an Outdoor Sauna : 16 Steps with Pictures

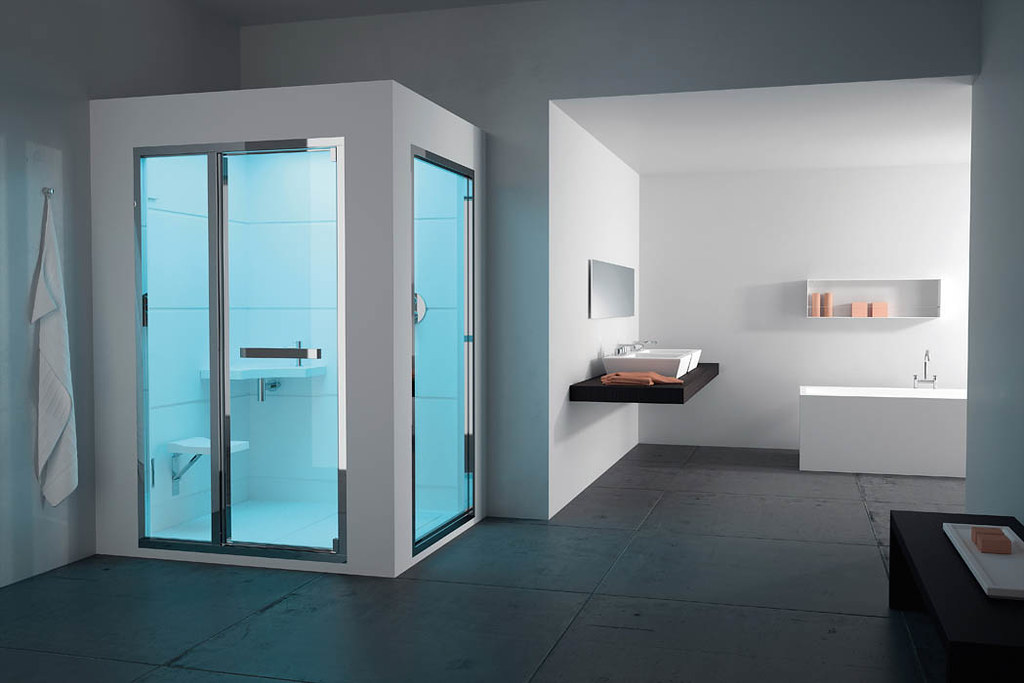
Access to outside of the house (back yard, porch, balcony…) is a good plus, as well as a window. Glass doors and inside window panels give natural light and prevent any claustrophobic feelings inside the sauna. A drain inside the sauna room allows a more freely use of water, and makes cleaning of the sauna easier. Electric heaters should be sized according to the size of the sauna. All UL-listed heaters have specific size ranges within which they safely operate. Heater kilowatt sizes typically range between 1.5 kW and 15 kW, and the respective breaker size varies between 15 and 60 Amps.

Lastly, you will need to invest in cedar or plastic planks that are designed for outdoor use and use these to line the walls and floor of the sauna. With these precautions, you can enjoy an outdoor sauna in the comfort of your backyard. For saunas, it’s important to choose softwoods that are moisture- and warp-resistant in temperatures of at least 150 degrees Fahrenheit. Popular options include cedar, aspen, spruce, and hemlock for their uniform textures and subtle scents. There are pros and cons of each panel type, so choose the one that works best for your style and budget. You also have the chance to add various accessories of your liking.

Build a Sauna

No, you should only choose high-quality wood to build your sauna. Not all types of woods can withstand the pressure from heat or moisture. Only use softwoods, such as cedar and aspen, that are known for absorbing heat and resisting water. Insulation is a critical step, as it helps retain the heat inside your sauna. Fiberglass batt, a popular and preferred choice, is non-flammable and comes in rolls of 16- and 24-inch widths.

build a sauna at home

Whether you're putting together a DIY sauna or one from scratch, outdoor saunas generally give you more freedom. Compared to their indoor counterpart, electric and gas saunas can thrive outdoors in a bunch of different sizes. The only con of an outdoor sauna is that if you'd want to enjoy your spa-like experience, you may have to make your way through the rain or snow to get to the sauna door. I decided to just build a wooden platform floor in the sauna room under and in front of the bench area and leave exposed concrete around the wood stove. The platform does not extend all the way to the wall under the widest bench. This saves me some dollars in material cost and leaves an area around the wood stove that will not scorch if hot embers fall to the floor.

Choose a Size and Location

In addition, if you plan to use electricity to operate a heater or other accessories, you will need to ensure that the electrical installation is safe and up to code. When building a sauna, the exhaust ventilation system must be properly planned out. You will also need to properly insulate the shed to prevent heat loss. Once the insulation is complete, you can begin to install the sauna components. Choose a heater, benches, and any other items you would like to include in your shed sauna.

The walls are covered with 6” wide Western Red Cedar house siding, again from Menards. I had to dig for a while through the stock of boards to find ones that were suitable. All the paneling is attached with galvanized finishing nails except in the hard to hammer places where I used finishing dry wall screws.

Underground Sauna and Pool

The UL Safety Standard requires the maximum sauna temperature in the US not to exceed 195 F. All the UL listed heaters or sauna units follow this requirement. Depending on the type of sauna you purchase and how much you are willing to invest, it can increase the aesthetics, comfort, and convenience of living in your home. With an outdoor sauna, you can enjoy the benefits of the sauna without the need to drive to the gym or spa. It is also important to make sure the area has enough room to allow for adequate circulation of air.

build a sauna at home

You can start from scratch, construct a sauna kit, and even convert an indoor space into a spa-inspired bathroom. No matter which direction you go, here are the fundamental steps. This DIY outdoor sauna will be the centerpiece of your backyard. It’s definitely a bit harder to build than some other plans we’ve already mentioned, but it will look stunning once finished.

Do toilets go in before flooring?

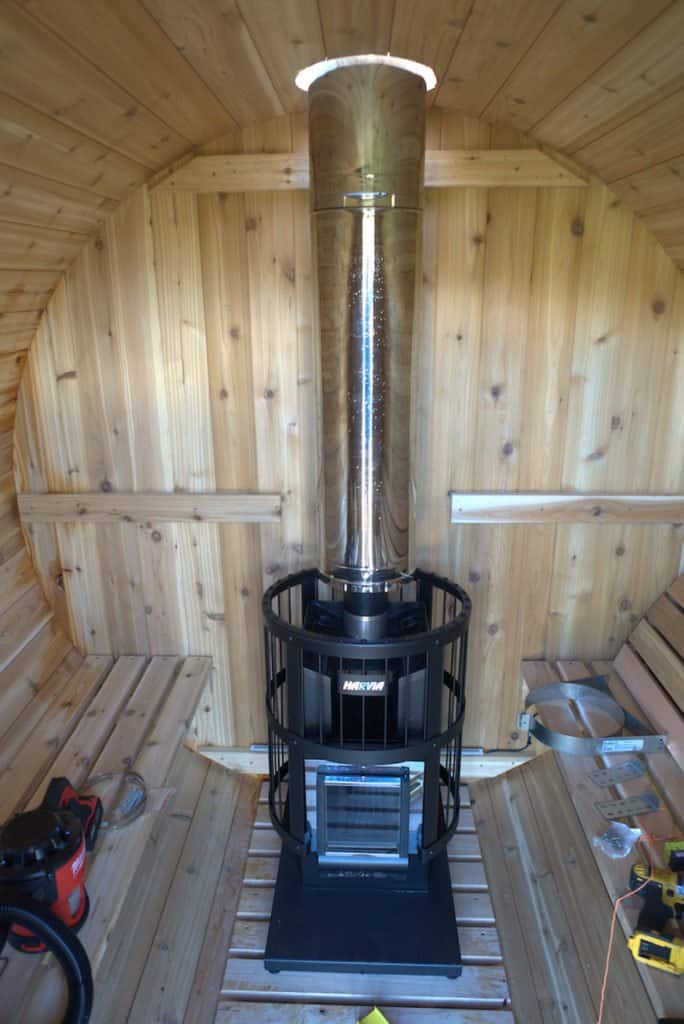
It’s also a good insulator and can heat up relatively quickly. However, it can be pricey, so it’s worth factoring that in before making any final decisions. Once I decided to run the chimney straight up through the roof and not through the side wall, I needed to find chimney components.

If you can dig deeper into your pockets, western red cedar can be a great option. Consider the type that’s locally available in your home area and the type you can afford. Woods are among the materials you should work getting for your building process.

Where to Build

Almost done now with the sauna room, I had to make an insulated door. I built a 2X4 frame to fit the door opening with ½” clearance all around. Before constructing the complete door I test fit the frame in the opening, then increased the clearance because of the slight un-squareness of the opening. The sauna room needs to be vented, especially if a wood heater is used. The fire would eventually burn off most of the oxygen in the sealed room and starve itself. I cut a about a 6 in X 12 in slot in front wall near the floor at a corner and another slot in the ceiling diagonal from the floor vent.

In general, an outdoor sauna should be near your actual house and have a power source for its electrical wiring. However, if you make an outdoor sauna from scratch, everything from the concrete foundation to the natural Canadian hemlock wood finish is up to you. If you want your sauna heater a certain size and the sauna stove a certain material, you have no restrictions. Sauna building, from scratch, can be more expensive if you have a custom sauna door and double-paned glass. It can also get tricky if you have no experience or deep knowledge of the parts of an infrared sauna in the hot room and constantly take apart your sauna to work on it again.

How much will it cost to build your own sauna?

Be sure the reveal is even and all air gaps are closed before tightening everything in place. Saunas use rocks to help even out the heat and for creating steam. Wash your sauna rocks to eliminate any foul-burning dust particles before placing them loosely around the heater element. Still, some may find that building a sauna is not the right choice.

build a sauna at home

However, if the sauna is to be located in a public space, such as a park or beach, you will need to obtain permission from the local authorities. Additionally, if you intend to build a commercial sauna, you will likely need to apply for a permit from your local government. Yes, you will likely need permission to build a sauna, depending on where it is located. If it is a personal sauna located on private land, such as your own home or backyard, you may not need permission from any authority.

DIY Sauna Build Your Own Sauna at Home

Next, follow it up by installing the aluminum vapor barrier over the wall insulation, stapling it to the walls and ceiling with 3 inches of overlap. This helps keep moisture from seeping out, prohibiting mold growth. The 5’x 8’ outdoor cabin sauna kit will allow you to create a beautiful, functional sauna that you and your family can use. The assembly will be a breeze if you buy the kit since it comes with detailed instructions. Since this is a kit, it comes with all the materials you need, but again, you can use this as an example and make your sauna with this design.

build a sauna at home

I had to move the breaker box from what is now the entry into what is now the storage area. There are two large wooden posts (approx. 8in X 8in) that sort of support the span of the roof trusses. I think they don’t really help that much to support the structure since they were just wedged in place and held with a few nails through a truss. I added a recessed LED ceiling light in the sauna room, a cheap ceiling fixture in the changing room, even cheaper ceiling fixture in the entry.

Why are clothes not allowed in sauna?

If the answer is yes, nothing should stop you from designing your relaxation point with everything that suits your needs. Designing your own sauna seems like a perfect idea rather than getting a portable unit with pre cut and designed parts. But you cannot dive straight into it if you’re never done such a thing before. Materials like Western red cedar are beneficial because of their longevity and because they can hold their own against the vapor barrier that steam creates. However, cedar can be expensive which is why natural Canadian hemlock wood may be chosen despite the fact that it has a slightly sour smell. Fasten with screws through the door jamb into the rough opening, using shims to square up the door frame.

There’s useful info in there about the materials they used, the insulation techniques and much more. If you have an old shed or other outside building you don’t use, you don’t need to build a sauna from scratch – you can just convert the structure that’s already there. As the author explains, this is a sauna that is designed to be comfortable for up to four people, and if that’s what you’re looking for, this could be a great plan to attempt.

Introduction: Building an Outdoor Sauna

The time will depend on the type of wood you are using and the amount of people working on it. The final step in installing your sauna would be adding its roof/ceiling and finishing with wood shingles on top. The other important thing to make sure you get right is the insulation of your sauna.

For flooring, wood must be used as this can withstand high temperatures while tiles or concrete. There are some stoves that you can never use without traditional sauna rocks. Wash the rocks with fresh water to remove all the dust that might create an unpleasant smell. Place the clean rocks behind the heater, so the sensors don’t indicate that the chamber has reached maximum temperatures when that’s not the case. A sauna can be placed in many different areas of the home, but the space should be big enough to accommodate it. Take measurements of the area to make sure the sauna is the right size for the space.

DIY Basement Sauna

The price of the sauna you want to build depends on many factors. You will need to consider the size and the materials you will use. A DIY sauna project can cost you anywhere from $1,000 to $12,000 or more. Always check out all the options, especially if you’re on a tight budget. A wooden stove creates a special ambience and warmth that relaxes you especially if you use sauna rocks.

By submitting your info on this form, you are agreeing to be contacted regarding your service request by means of email. This is no obligation form and doesn’t require you to purchase any service. He enjoys bringing cutting-edge information on home renovation and remodeling to Kitchen Infinity.

Don’t forget adjacent spaces within the bathroom, basement or landscape. It is far simpler to buy and build a sauna kit than to plan and build one from scratch. With a kit, you can convert an indoor space or set up a pre-built freestanding model outdoors. If you’re going the electrical route, the sauna heater’s aesthetic may come into play too. The heater’s finish and style can easily influence the feel of your sauna, so take some time to research options and find one that matches your taste.

Line the inner wall frames and ceiling with rolls of batt insulation, covering the entire inner walls from floor to roof. Trim the width based on the distance between the wall studs. After the framing is in place, you can run wires into the sauna space.

Outdoor Sauna Building Plan

Nice website and thanks for putting together the various builds. That’s right – for this one, you don’t need to worry about cutting up planks, preparing foundations or building permanent structures. After all, there’s not much more to a sauna than an insulated building and something to generate heat and steam.

This is a highly creative sauna plan, and there’s lots of great advice in there about building it, too. It’s not just a plan, it’s a whole story – the story of building a DIY sauna in the backcountry of Canada’s Whistler. If that sounds like something that could save you a lot of hard work, here’s a plan you can follow to get it done.

The basement must have a concrete foundation, so you will need to build one if yours doesn’t. Every person should have a place to relax, unwind, and take their mind away from stressful situations. There’s no better way to relax than having a personal sauna, and guess what? If you are handy and love DIY, you can build one yourself in no time! Although this might seem or sound complicated, there are simple plans you can follow to create a fantastic DIY sauna. The trick is to find the most convenient option based on what you want.

build a sauna at home

In addition, having a proper exhaust vent system helps prevent moisture damage to the structure and the surrounding area due to the steam created in a sauna. This is especially important if you are using a sauna constructed in an enclosed area. Be sure to confirm such requirements with the relevant building, zoning, and safety regulations before starting construction on your sauna.

A window or glazed glass door will open the space, making the sauna more open-air. While sitting in a dry sauna, use a long handled dipper to pour the water onto the heated rocks. You can also invest in a timer to monitor the heat and prevent overheating. You’ll need to build on a solid foundation, such as concrete, to frame the walls and roof securely. You can hire a woodworker to have an extra set of hands during this step. If you’re converting an existing space, such as a room, you’ll need to strip it down to the bare wall studs and ceiling joists.

build a sauna at home

Lastly, you will need to invest in cedar or plastic planks that are designed for outdoor use and use these to line the walls and floor of the sauna. With these precautions, you can enjoy an outdoor sauna in the comfort of your backyard. For saunas, it’s important to choose softwoods that are moisture- and warp-resistant in temperatures of at least 150 degrees Fahrenheit. Popular options include cedar, aspen, spruce, and hemlock for their uniform textures and subtle scents. There are pros and cons of each panel type, so choose the one that works best for your style and budget. You also have the chance to add various accessories of your liking.

Port Charlotte, FL Furniture & Mattress Store

Table Of Content All Store Locations Open Today! Financing Plans CUSTOMIZE YOUR BEDROOM Accessories Visit Us Shop With Us Visit us today...